• Account Setup

    Create Account

    1. Click Sign Up on the Login page and enter your email address in the specified field
    2. Click Submit
    3. Check your email for a confirmation link
    4. Click confirmation link and register your account
    5. Log in to your account
  • Running Counts

    Start a Quick Count

    1. Click Quick Count Running a Quick Count is the fastest way to jump into the Portal and identify your ideal prospect. After selecting your Database, Campaign Type, & Select Type you will be taken to the Count Builder where you will proceed to filter your target audience. on top tight toolbar
    2. Select the Database There are multiple databases in the Portal. Choose the database that most accurately represents your offering or service. Business database for B2B data, Consumer database for Consumer data, Mortgage Database for Mortgage data, & New Mover Database for New Mover/Homeowner data. you want to run a count on
    3. Select your Campaign TypeThere are a few different campaign selections in the Portal including Direct Mail and Telemarketing. Choose the Campaign Type according to what you plan to use the data for.
    4. Set your Select TypeThis tab allows you to select records by One Per Business, One Per Household, or One Per Individual. Select the option that best suits your marketing needs.
    5. Click Go!

    You can also run a count in the Databases Section

    • On the Top of the Databases Database tab can be found in the Main Navigation Menu and will direct you to a page that allows you to run a database count by default. Simply click on the database in the My Databases section to do so. page, you can use the count drop down options
    • Or, under My Databases , click Count on the specific Database you wish to run a count on
  • Choosing Selects

    Add Selects & Place Your Count

    1. Click on any Select Header Select Headers are found on the Count Builder Page. The Select Headers include Geography, Business Profile, Executive Profile, Quality, and SIC for Business Data as well as Geography, Demographics, Dwelling & Mortgage, and Specialty for Consumer Data. to expand window and view available options
    2. Click on the sub-header you wish to use
    3. Add or Omit selects to your count by clicking on desired options in box on the right.
    4. Hold down the control or command key to Add or Omit multiple options.
    5. Click Add or Omit button

    Place and Save Your Count

    1. Click Place Count Placing a count is the finalization of the Count Builder Page. Once you have determined all of the proper selects, click Place Count to move forward with your order. button to view results
    2. The Count Results If the Details Tab is a self-checkout, the Count Results Page could best be thought of as your receipt. Through this page, you can see a notepad view of your count that will show you the number of records that exist within each geographic region of your count. pop-up box will appear and display the Database, Count Reference Number, and Available Records
    3. If you’d like to revise your count, click the Revise The Revise button will take you back to the Count Builder to allow for further editing. button
    4. If you want to save your count, type in a name for it in the Name Your Count Below field
    5. Click Save Count
  • Ordering Records

    Placing your Order

    1. After saving your count, the Order Count pop-up box will appear
    2. Type in the number of records you’d like to order from your Record Balance (no commas)
    3. Click Order Records Click the Order Records button to finalize the order of your records.
    4. After you place your order, you’ll be directed to the Job View The Job View Page presents you with an inline order confirmation to show if your order was a success as well as the breakdown of your order selects. page.
    5. Click the Refresh button anytime to check on the status of the order
    6. When the order is available, the Download button will appear in place of the Refresh button

    Downloading your Order

    1. Before clicking Download Clicking the Green Download Icon will download your data. , make sure your pop-up blockers are turned off.
    2. Click Download Clicking the Green Download Icon will download your data. to access your order.
    3. Unzip the file and open the .csv output file to access your records
    4. You can go to the Lists section to download, edit, or delete any of the orders you have placed.

    Note: Pop-Up Blocker may interfere with downloading files. Please disable before downloading.

  • Running Suppressions

    Suppress vs. Previous Orders

    1. When you are running a count, you can suppress it vs. previous orders by clicking the Suppression Tab The Suppression Tab can be found in the box on the right side of the Count Builder Page next to the Detail Tab. (next to Details Tab The details tab can be found in the box on the right side of the Count Builder Page. Think of the Details Tab as self-checkout and as a way to double check that your selects are being added to your count as you intend. ).
    2. Click the box next to the order(s) you wish to suppress against. If you wish to suppress against all previous orders, simply click the button in the first row/column.
    3. When you place your count, the results will reflect the total unique quantity

    *if you have external files that you want to suppress against in the ListGIANT portal, please contact your list specialist at 800-383-1381

  • Glossary

    Dashboard - The Dashboard will be your home base and give you quick access to previously run counts and completed list orders.

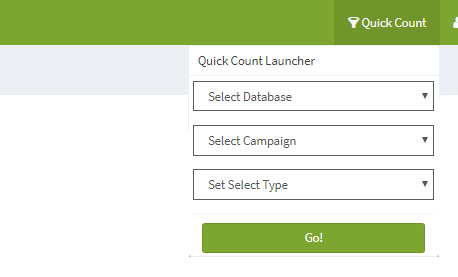
    Quick Count - Running a Quick Count is the fastest way to jump into the Portal and identify your ideal prospect. After selecting your Database, Campaign Type, & Select Type you will be taken to the Count Builder where you will proceed to filter your target audience.

    Database - There are multiple databases in the Portal. Choose the database that most accurately represents your offering or service. Business database for B2B data, Consumer database for Consumer data, Mortgage Database for Mortgage data, & New Mover Database for New Mover/Homeowner data.

    Campaign Type - There are a few different campaign selections in the Portal including Direct Mail and Telemarketing. Choose the Campaign Type according to what you plan to use the data for.

    Select Type - This tab allows you to select records by One Per Business, One Per Household, or One Per Individual. Select the option that best suits your marketing needs, for most, we suggest One Per Business for B2B and One Per Individual for Consumer campaigns.

    Database Tab - Database tab can be found in the Main Navigation Menu and will direct you to a page that allows you to run a database count by default. Simply click on the database in the My Databases section to do so.

    Main Navigation Menu - The Main Navigation Menu is your shortcut hub. It will direct you to your Counts, Databases, Lists, Admin, and Support Tabs.

    Select Type/Select Records By - This tab allows you to select records by One Per Business, One Per Household, or One Per Individual. Select the option that best suits your marketing needs.

    Count - A Count is the process the portal uses to define your Ideal Prospect. Running a count will filter the wanted and unwanted contacts from our database depending on your specific select criteria presenting you with actionable datasets.

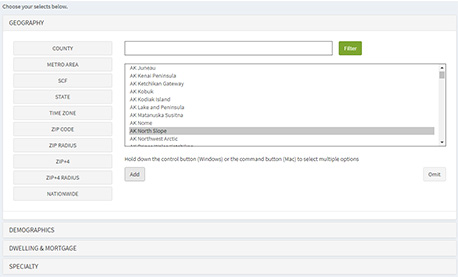
    Select Header - Select Headers are found on the Count Builder Page. The Select Headers specify which filters you may access to segment your dataset. The Select Headers include Geography, Business Profile, Executive Profile, Quality, and SIC for Business Data as well as Geography, Demographics, Dwelling & Mortgage, and Specialty for Consumer Data.

    Omit Button - The Omit button allows to choose a "negative select". Any Omitted criteria will be removed from your dataset when Placing Your Count.

    Add Button - The Add button allows you to choose "positive selects". All Added selects will be present within your dataset after Placing Your Count.

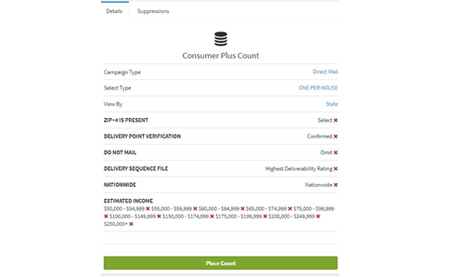
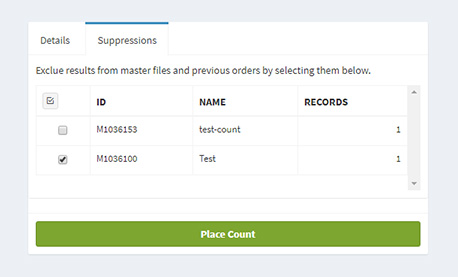
    Place Count - Placing a count is the finalization of the Count Builder Page. Once you have determined all of the proper selects, click Place Count to move forward with your order.

    Details Tab - The details tab can be found in the box on the right side of the Count Builder Page. Think of the Details Tab as self-checkout and as a way to double check that your selects are being added to your count as you intend.

    Count Results - If the Details Tab is a self-checkout, the Count Results Page could best be thought of as your receipt. Through this page, you can see a notepad view of your count that will show you the number of records that exist within each geographic region of your count.

    Reference Number - The reference number is a way for us to easily access your order. Please submit your Reference Number when reaching out to support to expedite your request.

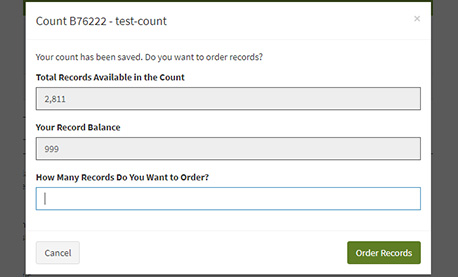
    Available Records - The Available Records header will show the amount of data that exists within your specified dataset after you have completed the select filtering process.

    Name Your Count Below - Naming Your Count Below is your opportunity to name your count for easy recall. We suggest naming all of your counts in an easily identifiable manner so you know exactly which dataset you are working with.

    Revise - The Revise button will take you back to the Count Builder to allow for further editing.

    Save Count - After saving your count it will be given a Count ID. Please use this account ID when submitting inquiries with support to expedite your request.

    Count Order - The Count Order Page will allow you to actually order records from your Count. Make sure you are entering the correct information into the How Many Records Do You Want to Order field as it will default to Your Record Balance.

    Order Records Button - Click the Order Records button to finalize the order of your records.

    Job View - The Job View Page presents you with an inline order confirmation to show if your order was a success as well as the breakdown of your order selects.

    Delete - The Delete button will allow you to delete your order.

    Edit - Also known as re-count, the Edit button will jump you right back to the Count Builder to make any alterations necessary for your order.

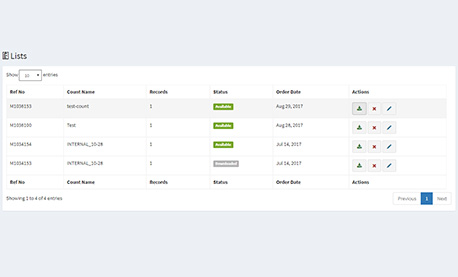
    Job Page (Lists Page) - Also known as the Lists Page, the Lists Page allows you to access all of your orders. From this page you can Download, Delete, or Edit your orders.

    Main Navigation Menu - The Main Navigation Menu is your shortcut hub. It will direct you to your Counts, Databases, Lists, Admin, and Support Tabs.

    Lists Page - Also known as the Job Page, the Lists Page allows you to access all of your orders. From this page you can Download, Delete, or Edit your orders.

    Green Download Icon - Clicking the Green Download Icon will download your data.

    Red X Icon - Clicking the Red X Icon will delete your Order or Count accordingly.

    Job View - The Job View Page can be accessed by clicking on an individual Job within the Lists Page.

    Suppression Tab - The Suppression Tab can be found in the box on the right side of the Count Builder Page next to the Detail Tab.

crossmenuchevron-down